
Learn step-by-step how to create a new mission in your application.
To begin, from the menu at the bottom of your screen, press " ". + "to create a new mission.

New: Use AI to automatically create a mission
A new feature of version 1.7 is the creation via AIYou can access it by clicking on the " " button. IA ".
You can dictate, write or copy/paste your mission statementFor example, you can copy and paste the following coupon:
Thank you for your booking.
We confirm your scheduled transfer as follows:
Date: Tuesday 18 April 2025
Pick-up time: 8.30 a.m.
Start address: 25 Rue de la Reynie, 75001 Paris, France
Destination: Paris-Orly airport (ORY)
Number of passengers: 4 including 2 children
Baggage: 2 Cabin 1 Hold
Amount: €130 incl. VAT
Note: to be paid directly to the driver (cash or credit card)
- Artificial intelligence automatically recognises useful information: date, address, passengers, etc.
- If the information is properly recognised, a green IA icon is displayed next to the field in question.
- If the AI has not recognised a piece of information, a IA red icon is displayed, indicating that you need to complete it manually.
💡 You can skip this step and complete the mission manually if you prefer.

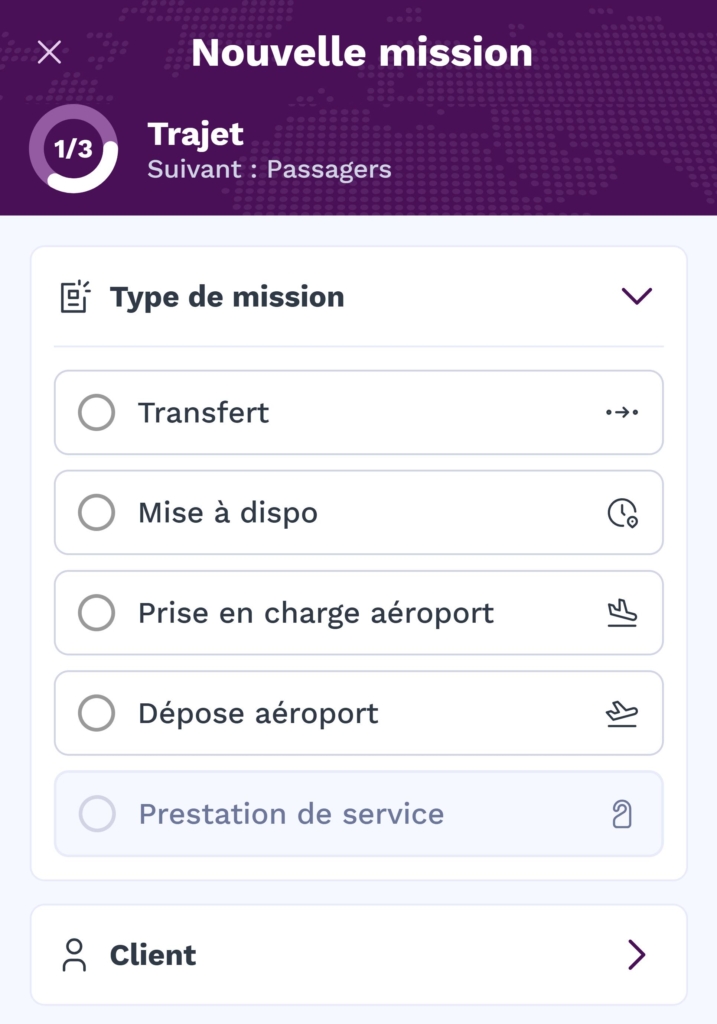
Configuring the route
Configuring the type of mission
Select the type of mission from the following options:
- Transfer
- Availability
- Airport pick-up
- Airport drop-off
- Service provision.
Enter details for a Transfer
If you have selected the "Transfer" mission type, enter the following information:
- Place of careEnter the exact address where the customer will be picked up.
- Date and time of pick-upIf you are not sure of the date and time you would like the job to start, please give us the date and time you would like the job to start.
- Place of depositIn the "Delivery" box, enter the destination address where the customer is to be dropped off.

Enter the details for a Release
If you have selected the type of job "Pick-up", enter the pick-up date and time, as well as the pick-up location and, if necessary, the drop-off location.

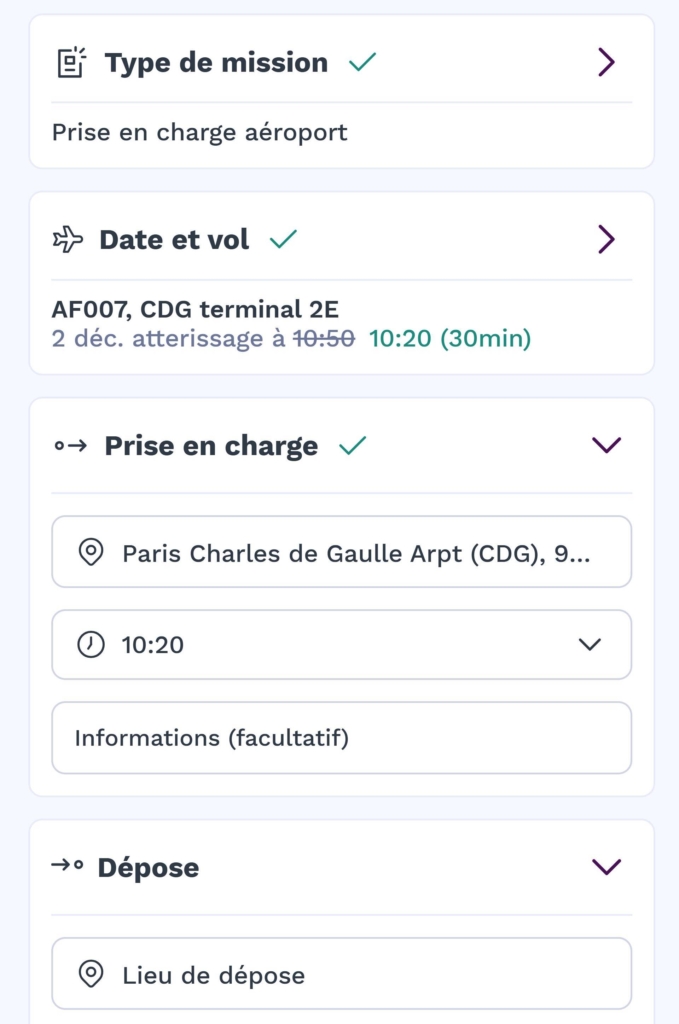
Enter details for airport pick-up or drop-off
If you have selected the "Airport pick-up" or "Airport drop-off" assignment type, fill in the flight information. Although this field is not compulsory, it is strongly recommended because :
- This allows you to receive flight-related changes (delays, gate changes, etc.) in real time.
- The address field is automatically filled in with the terminal concerned for greater accuracy and speed.
Also fill in the pick-up and drop-off locations, as well as other details if necessary.
Enter address information
In this section, you can enter practical details to make it easier to pick up or drop off your order. For example :
- "Portal code: 1234
- "Parking before the dead end
- "Ringing the intercom when you arrive
This information, although optional, allows you to personalise your service and ensure a smooth customer experience.
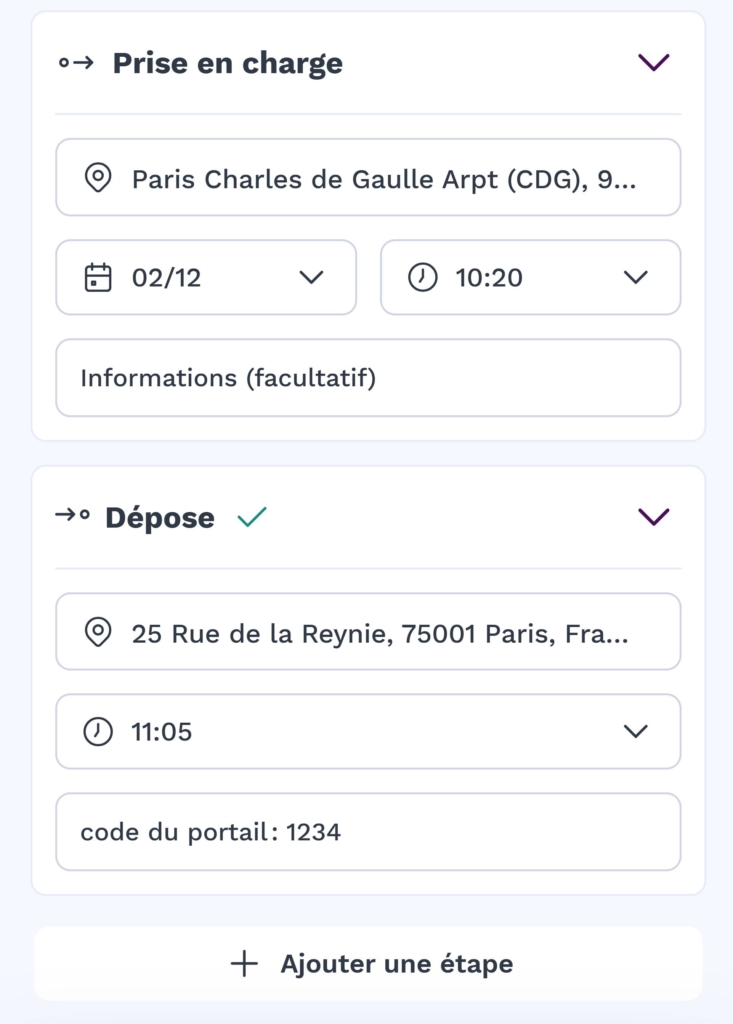
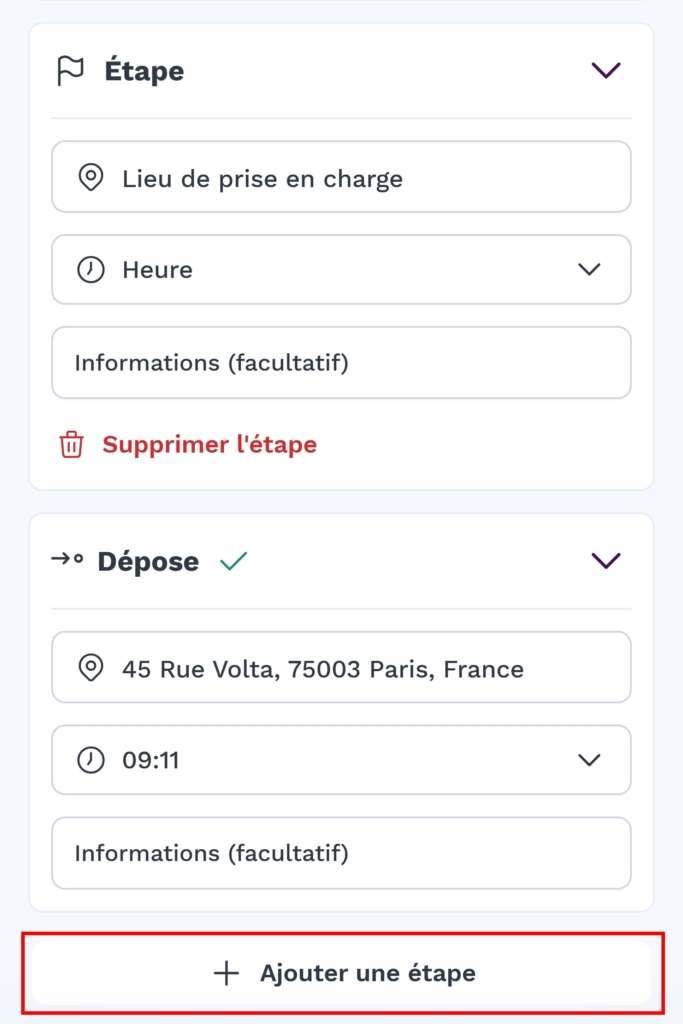
Optional: Add additional steps
If your journey includes one or more intermediate stops, you can add them by clicking on "Add a stopover". For each stopover, enter :
- The approximate time of the stop.
- The intermediate stop.
Selecting the client for the assignment
Go to the customer section
Once you've filled in the fields above, open the "Client" section to assign a client to this assignment.
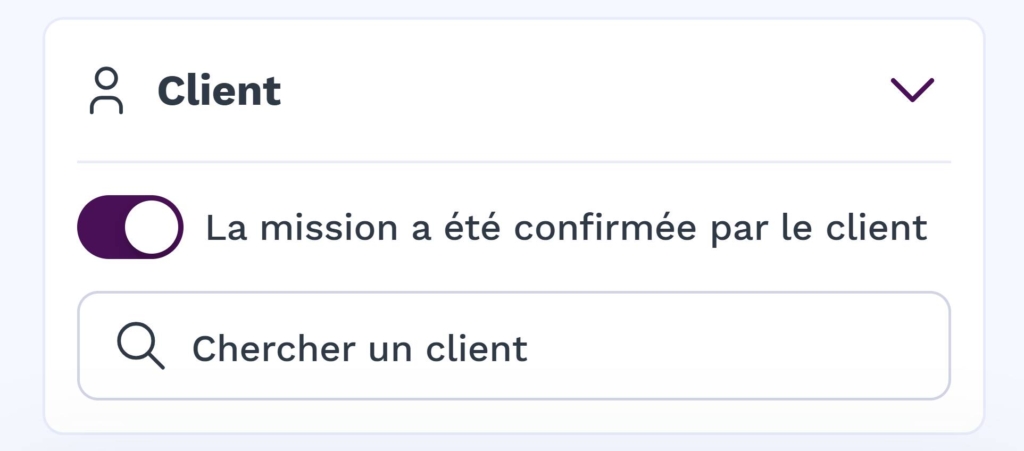
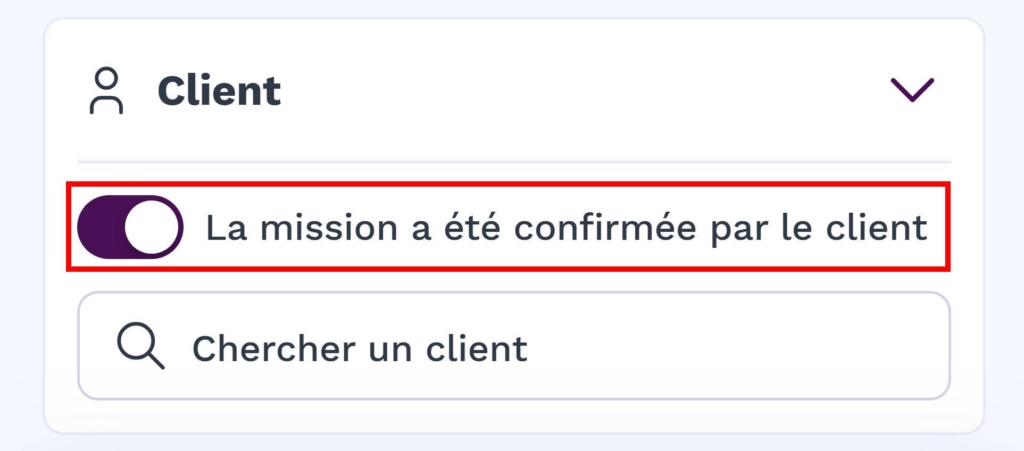
Indicate whether the assignment has been confirmed by the customer
Before selecting or adding a customer, activate or deactivate the "The assignment has been confirmed by the customer" box, depending on the situation:
- Activated: This means that the customer has validated the assignment in advance.
- Disabled: Used if the mission has not yet been confirmed or if you are waiting for validation.
Select an existing customer
Use the search field to find a customer who is already registered.
If the job has been confirmed by the customer, activate the corresponding button to indicate this confirmation.
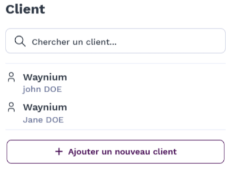
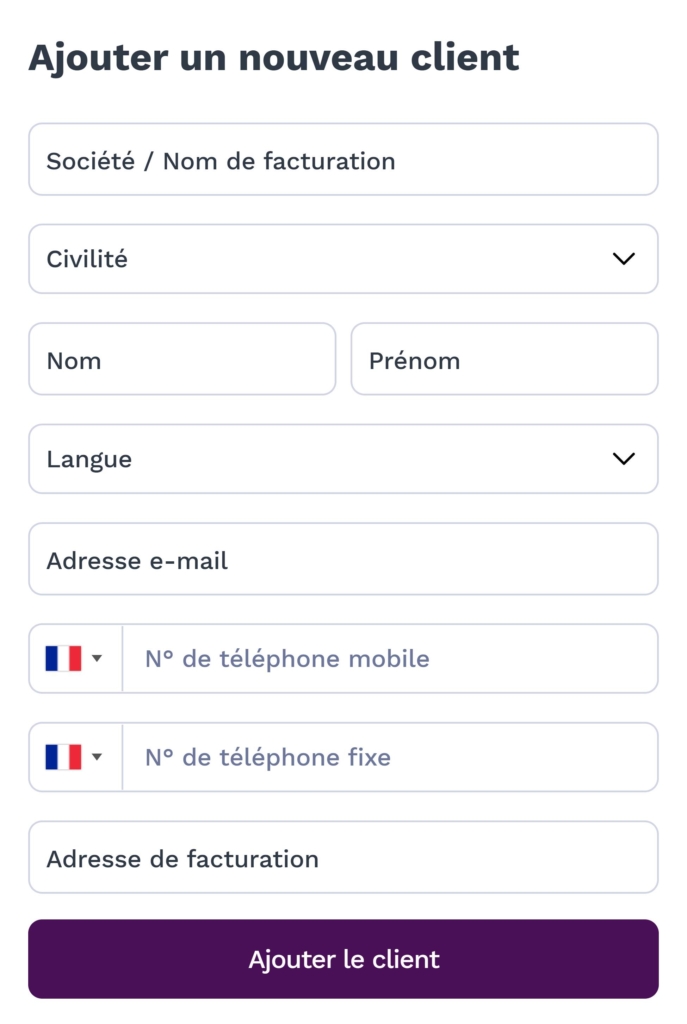
Add a new customer
If the customer is not yet registered :
- Press "Add a new customer".
- Fill in the information requested:
- Company / Billing name
- Title, surname and first name.
- Preferred language for communication.
- E-mail address and telephone numbers (mobile or landline).
- Billing address (optional, but recommended).
- Press "Add customer" to register.
Once the client has been assigned, check the information displayed, then press "Next" to continue.
Configuring the passengers on your mission
In the "Passenger information" section, the information for the main passenger is automatically filled in from the customer data. You can, however, change it if it differs or if other passengers need to be added.
Add or adjust passenger information
- Passenger name(s).
- The name for the welcome panel (can be changed if necessary).
- The total number of passengers and their type (adults, children, babies or disabled people with assistance).
Once again, items automatically recognised by the AI will be marked in green.
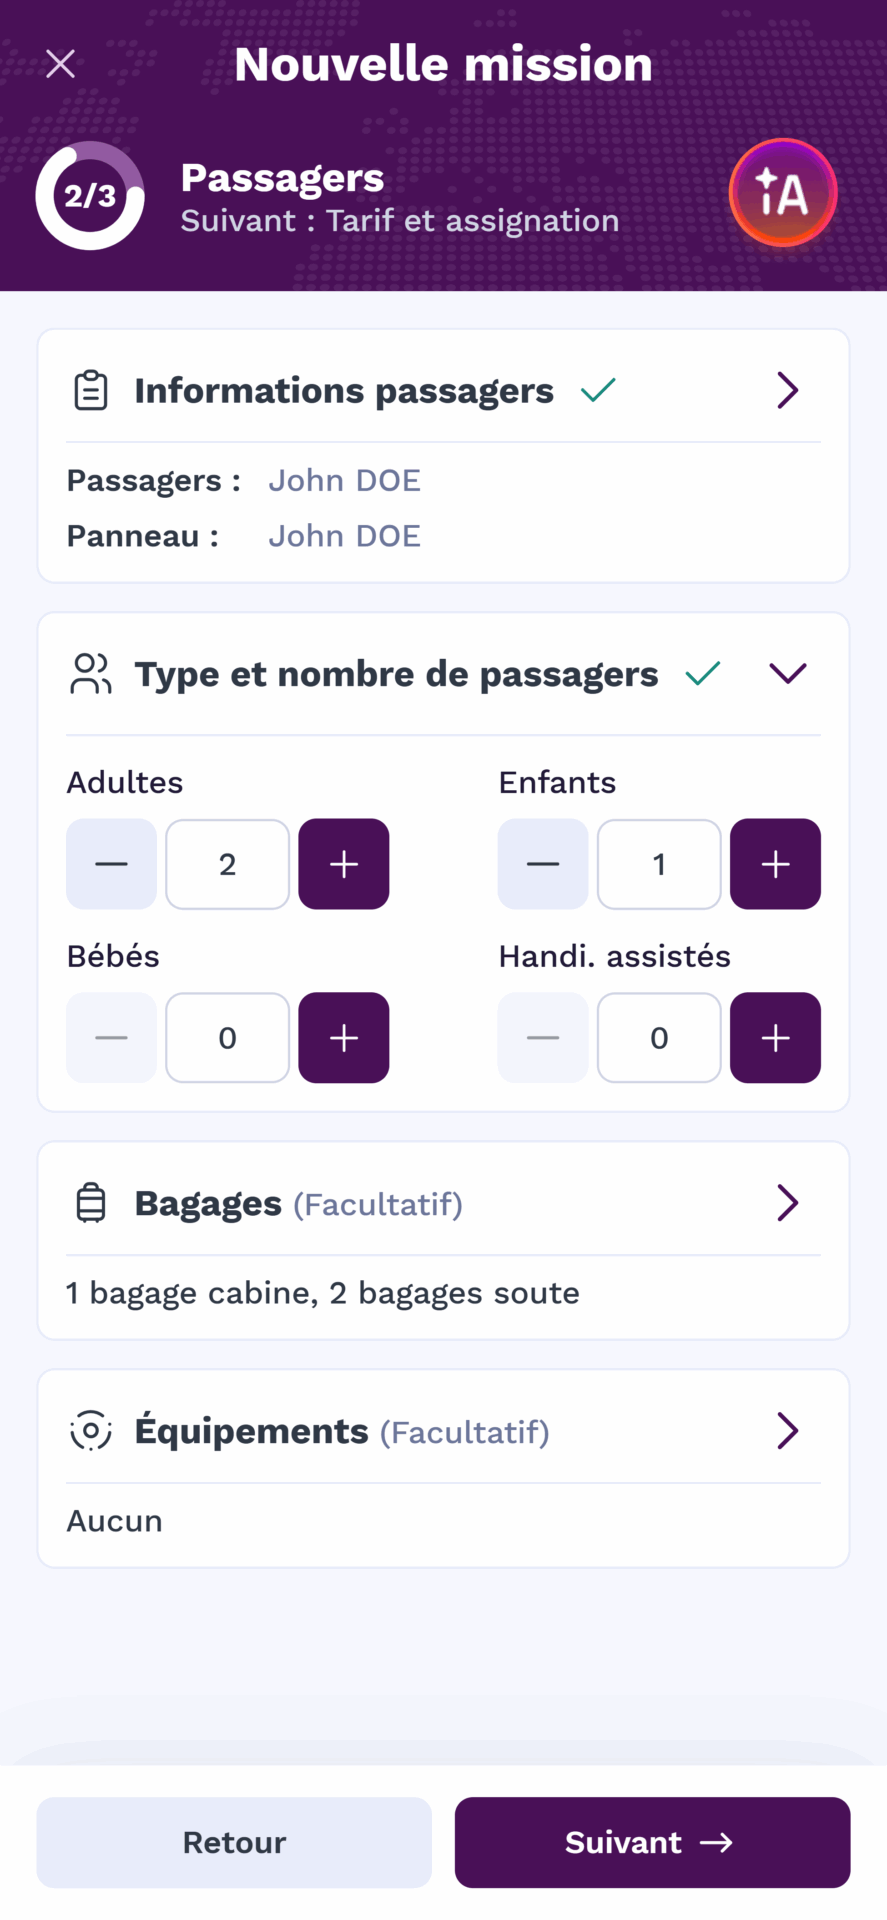
Adding luggage and equipment
WAY-Partner also allows you to configure optional additional options:
- The number of bags.
- Any specific equipment required (e.g. car seat, baby seat or booster seat).
Although this information is not compulsory, it enables us to personalise the service and ensure better customer care.

Setting the rate and assigning the job
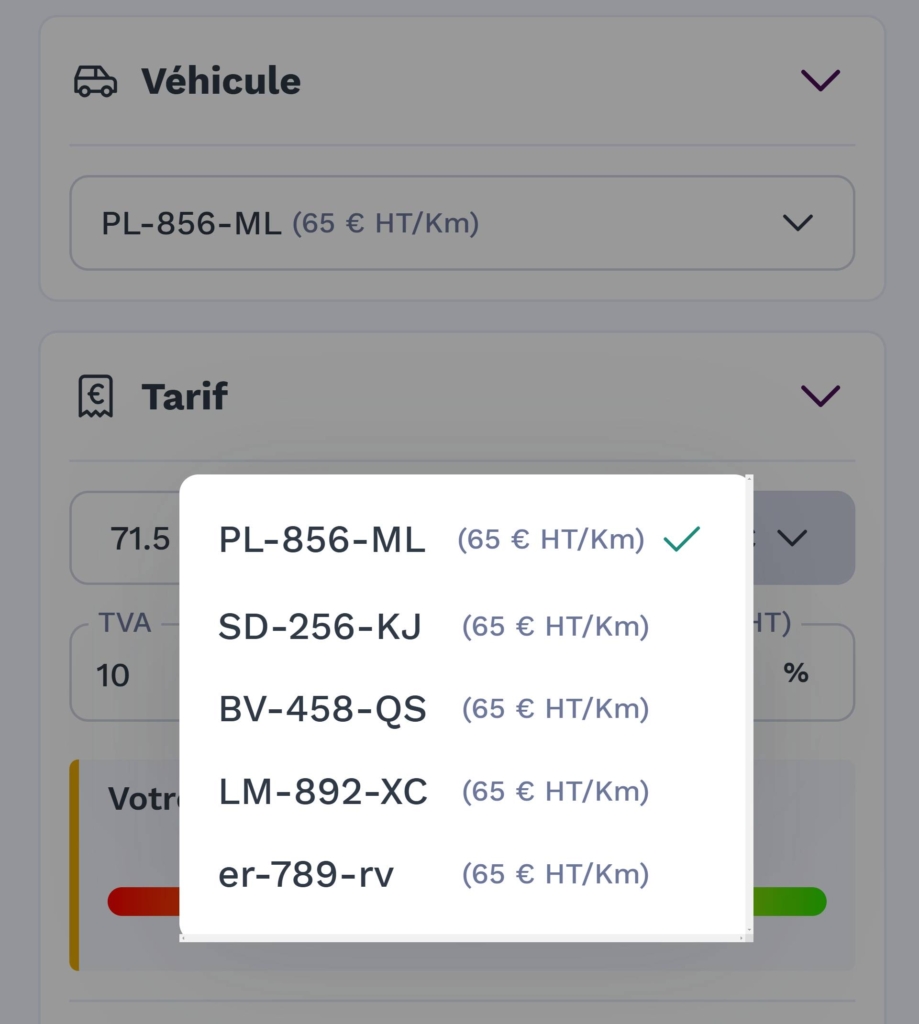
Select vehicle
- Press "Vehicle" to select the vehicle you wish to use for the mission.
- The list shows the vehicles already registered in your account.
- If the vehicle you want is not on the list, you can add it by pressing "Add a vehicle" (see the "Updating Vehicle Information" guide for more details).
- Each vehicle displays an indicative estimate of the rate per kilometre, for example €10 excluding VAT/Km. This amount is based on the vehicle's average CO2 consumption and the rates charged for your previous journeys.
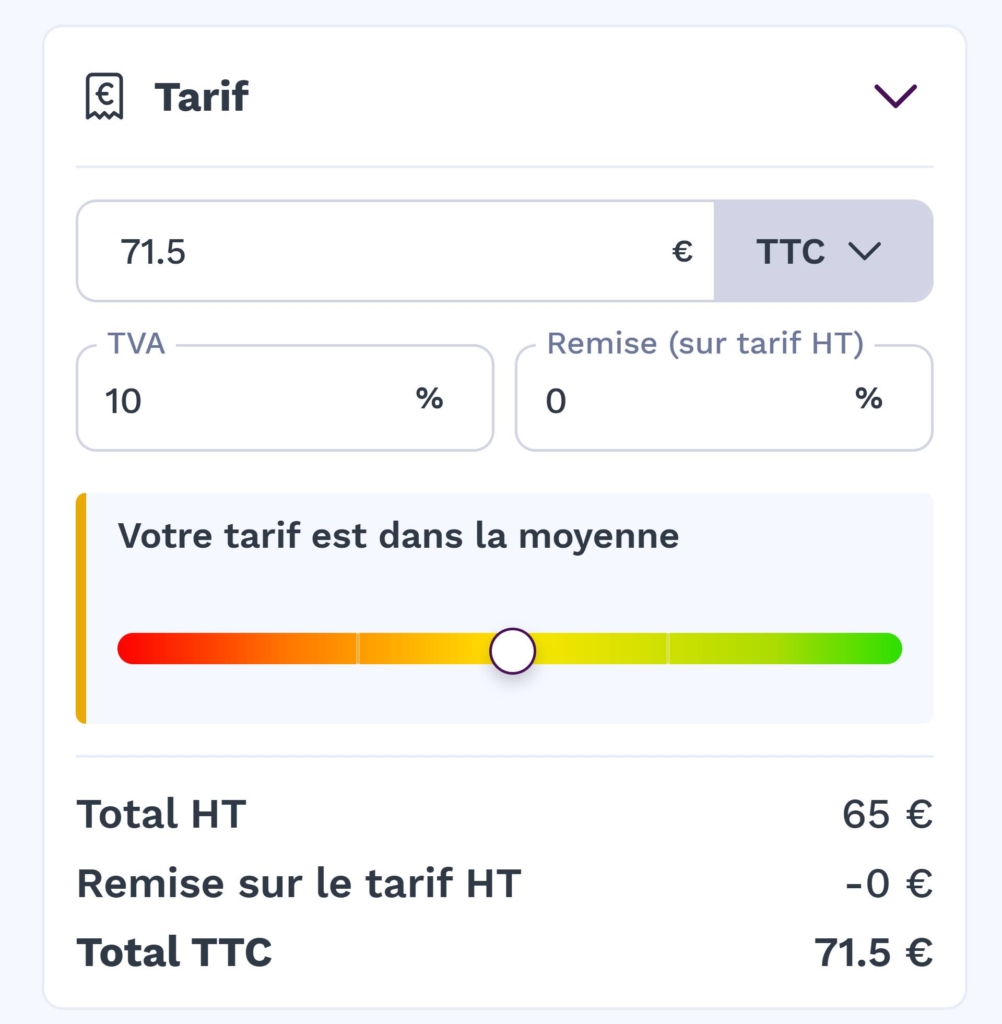
Configure tariff
A price including VAT is automatically suggested by the application.
Important information: This rate is code and non-binding. You can personalise it according to your preferences.
You can set the tariff in two ways:
- Using the tariff gauge : Move the circle to adjust the rate.
- Red zone and beyond : below-average rate.
- Yellow zone : balanced fare.
- Green zone and beyond : higher than usual.
- By entering a manual tariff :
Click in the tariff field and enter the desired amount directly.
Note: The gauge is a visual tool, but you are free to exceed or remain outside its limits.
You can choose to enter the rate in Including all taxes or in excl. taxaccording to your requirements. The application will automatically calculate the corresponding amount based on the VAT parameters.
If necessary, adjust the VAT or apply a discount for the mission.
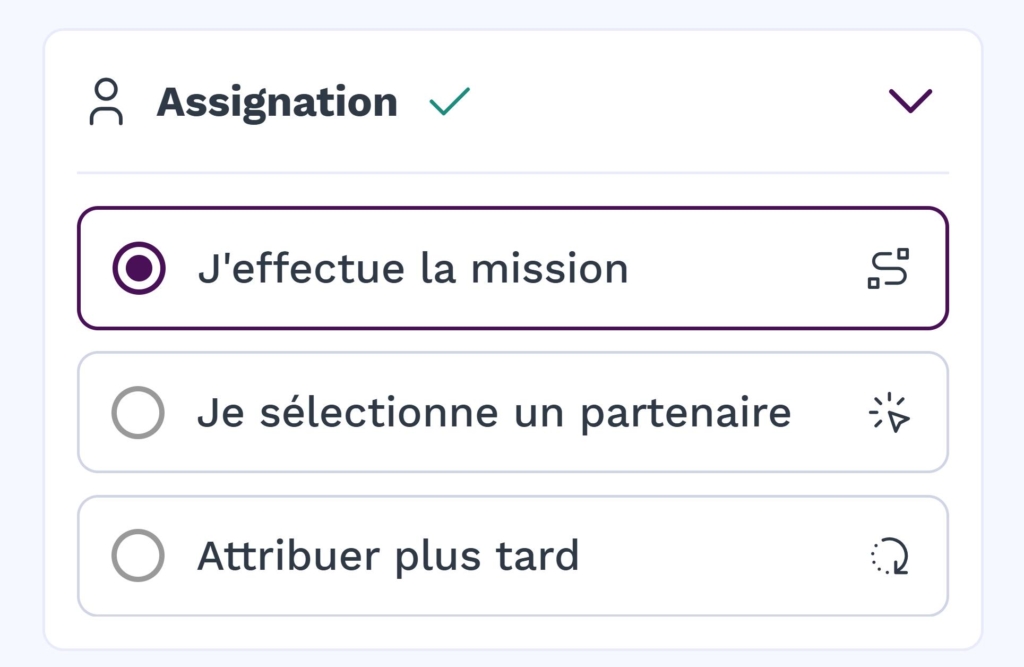
Configuring the assignment
By default, the assignment is set to "I carry out the mission. As the name suggests, this is the mission you set yourself.
You can also choose :
- I select a partner : appoint a partner to carry out the assignment.
- Allocate later : register the mission without immediately defining who will carry it out.
Optional: Add References and Notes
Go to References and Notes
In the job creation form, scroll down to the " References and notes" .
This section is optional and has no impact on invoicing or the main configuration of the assignment.
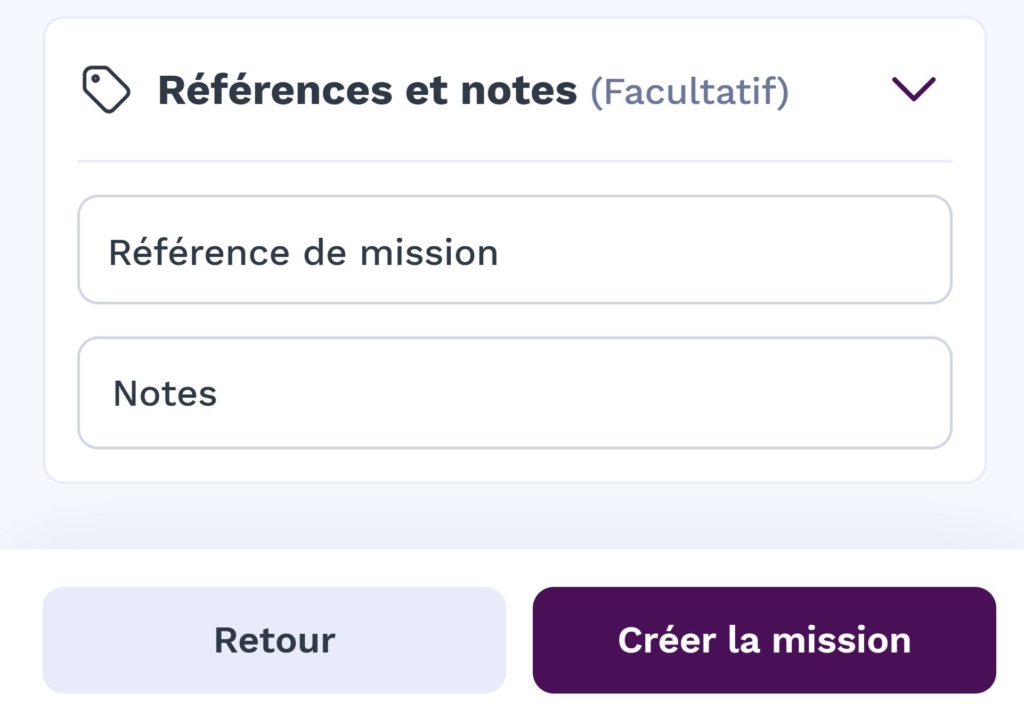
Understanding the use of References
Job reference: You can enter a specific identifier or number for the job.
This can make it easier to track and search your archives or deal with your partners.
Understanding the use of Notes
Notes can be used to add internal information to personalise the service or remind you of specific instructions.
These notes are particularly useful when the assignment is assigned to a partner, as they are shared with the partner to ensure that the assignment is handled correctly.
Practical advice
Be clear and precise in your notes so that any instructions are clearly understood by a potential partner.
Finalise and create the mission
Validate the mission
Once you have entered all the information (details of the assignment, customer, passengers, vehicle, fare, etc.), press ". Create the mission" .
Confirmation page
Once the mission has been successfully created, a confirmation screen is displayed.
There are two options:
- " Go to the mission "You will be redirected to the assignment details page, where you can view, modify or manage the stages of the assignment.
- " Sharing the mission "This option opens your device's native sharing system (WhatsApp, e-mail, etc.) and generates an automatic summary of the mission. The content of the share includes :
- La date and time of the mission
- Le type of vehicle planned
- L'pick-up address and thedeposit address
- Le total amount of the mission
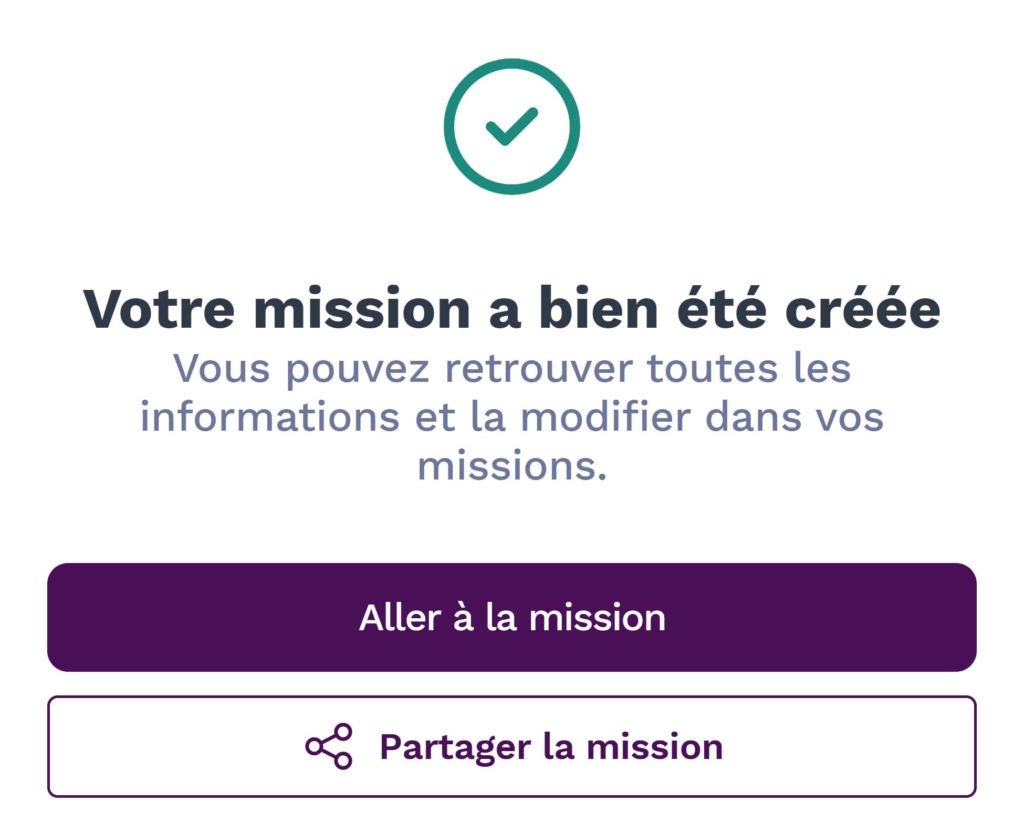
If you need to quickly send the details to a partner or customer, use the "Share mission" option for quick and clear sharing.
Practical advice
Creating an assignment has never been easier with WAY-Partner and its integrated AI assistant.
Add the necessary information and confirm the details.
Then manage your mission with ease, or share it with your partners for seamless organisation.
Before finalising, check your data and take advantage of our personalisation options to offer your customers a quality service.
Need assistance? Our support team is on hand to answer your questions!